Hands on with Azure Arc enabled data services on AKS HCI - part 1

As I’ve been deploying and testing AKS on Azure Stack HCI, I wanted to test the deployment and management of Azure Arc enabled data services running on one of my clusters.

This post is part one of a series that documents what I did to setup the tools and deploy a data controller. In other posts, I’ll detail deploying a PostgreSQL instance and how to upload metrics and usage data to Azure.

  • Part 1 discusses installation of the tools required to deploy and manage the data controller.

  • Part 2 describes how to deploy and manage a PostgreSQL hyperscale instance.

  • Part 3 describes how we can monitor our instances from Azure.

Hopefully it will give someone some insight into what’s involved to get you started.

First things first, I’ll make the assumption that you either have an Azure Stack HCI cluster with AKS running as that is the setup I have. If you have another K8s cluster, the steps should be easy enough to follow and adapt :) .

Install the tools

First things first, we need to set up the tools. As I’m on Windows 10, the instructions here are geared towards Windows, but I will link to the official documentation for other OS’.

  1. Install Azure Data CLI (azdata)
  1. Install Azure Data Studio
  1. Install Azure CLI

    • Install using the the following PowerShell command:
      Invoke-WebRequest -Uri https://aka.ms/installazurecliwindows -OutFile .\AzureCLI.msi; Start-Process msiexec.exe -Wait -ArgumentList '/I AzureCLI.msi /quiet'; rm .\AzureCLI.msi
    • Official documentation
  2. Install Kubernetes CLI (kubectl)

    • Install using the the following PowerShell command:
      Install-Script -Name 'install-kubectl' -Scope CurrentUser -Force
      install-kubectl.ps1 [-DownloadLocation <path>]
    • Official documentation

Once you’ve installed the tools above, go ahead and run Azure Data Studio - we need to install some additional extensions before we can go ahead and deploy a data controller.

Open the Extensions pane, and install Azure Arc and Azure Data CLI as per the screenshot below.

1.dataStudioExtensions.png

Deploying the data controller

Once the extensions are installed, you’re ready to deploy a data controller, which is required before you can deploy the PostgreSQL or SQL DB instances within your K8s cluster.

Open the Connections pane, click the ellipsis and select New Deployment:

2. createDC.png

From the new window, select Azure Arc data controller (preview) and then click Select.

3. createDC.png

This will bring up the Create Azure Arc data controller install steps. Step 1 is to choose the kubeconfig file for your cluster. If you’re running AKS HCI, check out my previous post on managing AKS HCI clusters from Windows 10; it includes the steps required to retrieve the kubeconfig files for your clusters.

Step 2 is where you choose the config profile. Make sure azure-arc-aks-hci is selected, then click Next.


5. createDC.png

Step 3 is where we specify which Azure Account, Subscription and Resource Group we want to associate the data controller with.

Within the Data controller details, I specified the ‘default’ values:

Parameter Value
Data controller namespace arc
Data controller name arc-dc
Storage Class default
Location East US

I’ve highlighted Storage class, as when selecting the dropdown, it is blank. I manually typed in default. This is a bug in the extension and causes an issue in a later step, but it can be fixed :)

I’ve highlighted the Storage class, as when selecting the dropdown, it is blank. I manually typed in default. This is a bug in the extension and causes an issue in a later step, but it can be fixed :)

Click Next to proceed.

Step 4 generates a Jupyter notebook with the generated scripts to deploy our data controller. If it’s the first time it has been run, then some pre-reqs are required. The first of these is to configure the Python Runtime.

I went with the defaults; click Next to install.

7. createDC.png

Once that’s in place, next is to install Jupyter. There are no options, just click on Install.

8. createDC.png

Once Jupyter has been deployed, try clicking Run all to see what happens. You’ll probably find it errors, like below:

I’ve highlighted the problem - the Pandas module is not present. This is simple enough to fix.

From within the notebook, click on the Manage Packages icon.

Go to Add new and type in pandas into the search box. Click on install to have Pip install it.

10. addextension.png

In the Tasks window, you’ll see when it has been successfully deployed

With the pandas module installed, try running the notebook again. You might find that you get another error pretty soon.

12. workbookerror.png

This time, the error indicates that there is a problem with the numpy module that’s installed. The issue is that on Windows, there is a problem with the latest implementation, so to get around it, choose an older version of the module.

Click on Manage Packages as we did when installing the pandas module.

Go to Add new and type in numpy into the search box. Select Package Version 1.18.5 . Click on install to have Pip install it.

13. numpy.png

You may also see some warnings regarding the version of pip, you can use the same method as above to get the latest version.

14. pip.png

OK, once all that is done, run the notebook again. I found that yet another error was thrown. Remember when I said there was a bug when setting the Storage Class? Well, it looks like even though I manually specified it as ‘default’ it didn’t set the variable, as can be seen in the output below.

The -sc parameter is not set. Not to worry, we can change this in the set variables section of the notebook:

arc_data_controller_storage_class = 'default'
16. fixvariable.png

And again, Run all again and when the Create Azure Arc Data Controller cell is run, you’ll notice in the output the parameter is correctly set this time around.

17. dcrunsuccess.png

From here on, there shouldn’t be any problems and the data controller deployment should complete successfully. Make a note of the data controller endpoint URL, as you’ll need this for the next step.

dmc@dmc-tech.co.uk

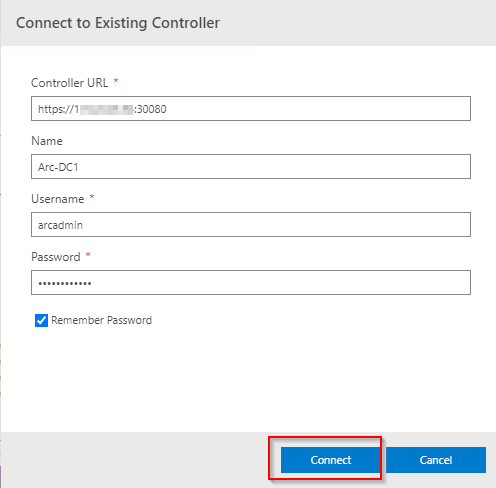
Connect to the Controller

Now that the data controller has been deployed, we need to connect to it from within ADC.
From the Connection pane, expand Azure Arc Controllers and click Connect Controller.

19. connectCont.png

Within the Connect to Existing Controller pane, enter the Controller URL recorded from the previous step, Name, Username and password that were specified when setting up the data controller.

20. connectCont.png

All being good, you’ll now see the entry in the connections pane.

21. connectCont.png

As you can see, there were a few things I had to workaround, but as this is a Preview product, it doesn’t bother me as it means I learn more about what is going on under the covers by getting it to work. I’m sure that by the time it is GA, the issues will be resolved.

Managing AKS HCI Clusters from your workstation

In this article, I’m going to show you how you can manage your minty fresh AKS HCI clusters that have been deployed by PowerShell, from your Windows workstation. It will detail what you need to do to obtain the various config files required to manage the clusters, as well as the tools (kubectl and helm).

I want to run this from a system that isn’t one the HCI cluster nodes, as I wanted to test a ‘real life’ scenario. I wouldn’t want to be installing tools like helm on production HCI servers, although it’s fine for kicking the tires.

Mainly I’m going to show how I’ve automated the installation of the tools, the onboarding process for the cluster to Azure Arc, and also deploying Container Insights, so the AKS HCI clusters can be monitored.

TL;DR - jump here to get the script and what configuration steps you need to do to run it

Here’s the high-level steps:

  • Install the Az PoSh modules

  • Connect to a HCI cluster node that has the AksHCI PoSh module deployed (where you ran the AKS HCI deployment from)

  • Copy the kubectl binary from the HCI node to your Win 10 system

  • Install Chocolatey (if not already installed)

  • Install Helm via Choco

  • Get the latest Container Insights deployment script

  • Get the config files for all the AKS HCI clusters deployed to the HCI cluster

  • Onboard the cluster to Arc if not already completed

  • Deploy the Container Insights solution to each of the clusters

Assumptions

  • connectivity to the Internet.

  • Steps 1 - 5 of the Arc for Kubernetes onboarding have taken place and the service principal has required access to carry out the deployment. Detailed instructions are here

  • You have already deployed one or more AKS HCI clusters.

Install the Az PoSh Modules

We use the Az module to run some checks that the cluster has been onboarded to Arc. The enable-monitoring.ps1 script requires these modules too.

Connect to a HCI Node that has the AksHci PowerShell module deployed

I’m making the assumption that you will have already deployed your AKS HCI cluster via PowerShell, so one of the HCI cluster nodes already has the latest version of the AksHci PoSh module installed. Follow the instructions here if you need guidance.

In the script I wrote, the remote session is stored as a variable and used throughout

Copy the kubectl binary from the HCI node to your Win 10 system

I make it easy on myself by copying the kubectl binary that’s installed as part of the AKS HCI deployment on the HCI cluster node. I use the stored session details to do this. I place it in a directory called c:\wssd on my workstation as it matches the AKS HCI deployment location.

Install Chocolatey

The recommended way to install Helm on Windows is via Chocolatey, per https://helm.sh/docs/intro/install/, hence the need to install Choco. You can manually install it via https://chocolatey.org/install.ps1, but my script does it for you.

Install Helm via Choco

Once Choco is installed, we can go and grab helm by running:

choco install kubernetes-helm -y

Get the latest Container Insights deployment script

Microsoft have provided a PowerShell script to enable monitoring of Arc managed K8s clusters here.

Full documentation on the steps are here.

Get the config files for all the AKS HCI clusters deployed to the HCI cluster

This is where we use the AksHci module to obtain the config files for the clusters we have deployed. First, we get a list of all the deployed AKS HCI clusters with this command:

get-akshcicluster

Then we iterate through those objects and get the config file so we can connect to the Kubernetes cluster using kubectl. Here’s the command:

get-akshcicredential -clustername $AksHciClustername

Onboard the cluster to Arc if not already completed

First, we check to see if the cluster is already onboarded to Arc. We construct the resource Id and then use the Get-AzResource command to check. If the resource doesn’t exist, then we use the Install-AksHciArcOnboarding cmdlet to get the cluster onboarded to our desired subscription, region and resource group.

$aksHciCluster = $aksCluster.Name
$azureArcClusterResourceId = "/subscriptions/$subscriptionId/resourceGroups/$resourceGroup/providers/Microsoft.Kubernetes/connectedClusters/$aksHciCluster"

#Onboard the cluster to Arc
$AzureArcClusterResource = Get-AzResource -ResourceId $azureArcClusterResourceId
if ($null -eq $AzureArcClusterResource) {        
            Invoke-Command -Session $session -ScriptBlock { Install-AksHciArcOnboarding -clustername $using:aksHciCluster -location $using:location -tenantId $using:tenant -subscriptionId $using:subscriptionId -resourceGroup $using:resourceGroup -clientId $using:appId -clientSecret $using:password }
            # Wait until the onboarding has completed...
            . $kubectl logs job/azure-arc-onboarding -n azure-arc-onboarding --follow
        }

Deploy the Container Insights solution to each of the clusters

Finally, we use the enable-monitoring.ps1 script with the necessary parameters to deploy the Container Insights solution to the Kubernetes cluster.

NOTE
At the time of developing the script, I found that I had to edit the veriosn of enable-monitoring.ps1 that was downloaded, as the helm chart version defined (2.7.8) was not available. I changed this to 2.7.7 and it worked.
The current version of the script script on GitHub is now set to 2.7.9, which works.
If you do find there are issues, it is worth trying a previous version, as I did.

You want to look for where the variable $mcrChartVersion is set (line 63 in the version I downloaded) and change to:

$mcrChartVersion = "2.7.7"

Putting It Together: The Script

With the high level steps described, go grab the script.

You’ll need to modify it once downloaded to match your environment. The variables you need to modify are listed below and are at the beginning of the script. (I didn’t get around to parameterizing it; go stand in the corner, Danny! :) )

$hcinode = '<hci-server-name>'
$resourceGroup = "<Your Arc Resource Group>"
$location = "<Region of resource>"
$subscriptionId = "<Azure Subscription ID>"
$appId = "<App ID of Service Principal>"
$password = "<Ap ID Secret>"
$tenant = "<Tenant ID for Service Principal>"

Hopefully it’s clear enough that you’ll need to have created a Service Principal in your Azure Sub, providing the App Id, Secret and Tenant Id. You also need to provide the Subscription of the Azure Sub you are connecting Arc to as well as the Resource Group name. If you’re manually creating a Service principal, make sure it has rights to the Resource Group (e.g. Contributor)

Reminder
Follow Steps 1 - 5 in the following doc to ensure the pre-reqs for Arc onboarding are in place. https://docs.microsoft.com/en-us/azure-stack/aks-hci/connect-to-arc

When the script is run, it will retrieve all the AKS HCI clusters you have deployed and check they are onboarded to Arc. If not , it will go ahead and do that. Then it will retrieve the kubeconfig file, store it locally and add the path to the file to the KUBECONFIG environment variable. Lastly, it will deploy the Container Insights monitoring solution.

Here is an example of the Arc onboarding logs

Here is an example of the Arc onboarding logs

and here is confirmation of successful deployment of the Container Insights for Containers solution to the cluster.What you will see in the Azure Portal for Arc managed K8s clusters:

and here is confirmation of successful deployment of the Container Insights for Containers solution to the cluster.

What you will see in the Azure Portal for Arc managed K8s clusters:

Before onboarding my AKS HCI clusters…

Before onboarding my AKS HCI clusters…

..and after

..and after

Here’s an example of what you will see in the Azure Portal when the Container Insights solution is deployed to the cluster, lots of great insights and information are surfaced:

On my local system, I can administer my clusters now using Kubectl and Helm. Here’s an example that shows that I have multiple clusters in my config and has specific contexts :

The config is derived from the KUBECTL environment variable. Note how the config files I retrieved are explicitly stated:

I’m sure that as AKS HCI matures, more elegant solutions to enable remote management and monitoring will be available, but in the meantime, I’m pretty pleased that I achieved what I set out to do.

Deploying AKS HCI Gotchas

I’ve been testing AKS HCI for a couple of months now, and I’m really excited about it as a platform and the possibilities it unlocks.

In the course of my testing, I’ve encountered some problems and undocumented steps that need to be configured to unsure that when you deploy your cluster, you are more likely to have success. Here’s a list in no particular order:

  1. Using the PowerShell module is more efficient than using Windows Admin Center

  2. Make sure your HCI Cluster has the correct rights in AD

  3. Currently, you can only run the PowerShell modules directly on a HCI Node

  4. Create a WSSD directory on your CSV prior to install

I’ll try and add to the list as and when I come across other gotchas

Using the PowerShell module is more efficient than using Windows Admin Center

I’ve tested deployments using both WAC and the PowerShell module and I’ve found using the latter gives the more consistent experience.

When first setting up AKS on the HCI cluster via WAC, a number of binaries / agents / scripts / OS images are downloaded to a working directory on the system running WAC before being copied to a CSV on the cluster. If you restart the wizard for whatever reason, all the contents of this working directory are wiped and downloaded again. I’ve found that with WAC, all the possible K8s Linux images are downloaded (at approx. 4 - 4.5 GB per image):

As you can see above, the Windows image is even larger. You may not want to run Windows workloads at the moment, but you’ve got to get the image no matter what.

The PowerShell module is more efficient, as it only downloads the image you require at that time. You can also specify an image store directory for the images when deploying to a cluster. This directory is persistent, so if you need to re-run installations due to failures, at least the time taken to download the images is saved.

Make sure your HCI Cluster has the correct rights in AD

On a couple of occasions, I’ve come across issues which have been resolved by making sure that the Azure Stack HCI Cluster has been correctly configured within Active Directory. As the AKS HCI installer (both PowerShell and WAC based) creates a generic service on the cluster to run the ‘Cloud Agent’ which is required as part of the deployment, the cluster computer object needs the rights to create (and delete) Computer objects at least.

Here’s an example of an error I encountered when it wasn’t configured:

For anyone interested, this is how to configure AD to resolve the problem:

Open dsa.msc (Active Directory Users and Computers) as a user with rights to modify security on the OU that the cluster computer object is located in.

Make sure the ‘Advanced Features’ option is selected within the View menu, to expose the Security tab within the OU properties.


Navigate to the OU where the HCI Cluster computer object is located in (in the example above, it is in the default Computer OU). Right click and select Properties.

From the resultant window, click on the Security tab, then Advanced

Click on Add

Click on Add, then Select a principal (1). Make sure you add the Computer Object type (2), enter the name of the HCI Cluster in the object name, chcek it is valid and click OK (3).

Make sure that the Create and Delete Computer Objects permissions are selected and then click OK. on the open windows to assign the permission.

Currently, you can only run the PowerShell modules directly on a HCI Node

This is for awareness, but you must run the AKS HCI PowerShell modules on a HCI node, PowerShell remoting is not supported currently. So you will need to RDP to the server to do this.

Pre-create a WSSD directory on your CSV

For version 0.2.8 of the AksHci PowerShell Module, I found that the kube-config yaml file attempts to be stored in a directory called wssd on the CSV that you specify when setting the config (e.g. if you specify the following: Set-AksHciConfig -deploymentType MultiNode -wssdImageDir 'C:\ClusterStorage\Volume01\wssdImages' -cloudConfigLocation C:\ClusterStorage\Volume01\aks-clus01-config -vnetName Computeswitch, the install routine would attempt to store the kube-config file in C:\ClusterStorage\Volume01\wssd).

If the wssd directory does not exist prior to installation, the routine will error. To get around this, create the directory beforehand.

Error During install routine

Running the command that throws the error shows more detail

Creating the WSSD dir and re-running the command fixes the problem

Grow Your Azure Knowledge (Free Training)

If you haven’t seen this deal, its worth signing up for the generous price of free!

Pluralsight and Microsoft have partnered up for a free subscription to some Microsoft Azure courses on Pluralsight. You can register at Pluralsight and get a free Subscription for Microsoft courses valid until September 2025!

https://www.pluralsight.com/partners/microsoft/azure

Enjoy growing your knowledge.

Azure Stack Hub Update 2005

Microsoft recently released Azure Stack Hub Update 2005 (release notes here), and it is quite a big update, so I felt it warranted a blog post for some of the things I noticed that aren’t detailed in the release notes.

The first thing I noticed running the update is that there are some cosmetic updates.

First of all, the title in the portal is now correctly reflects the name change to Azure STack Hub. The above pictures show the before and after update changes. Note that the Region management ‘globe’ icon has changed too.

Other icons have also been refreshed to match those in Azure:

4-2005ASHUpdate.png

PrE-2005 Update icons

3-2005ASHUpdate.png

Post-2005 Update icons

I prefer the new look, FWIW.

When you run an operation that could block an update, you now get a warning in the Update Management blade:

As you can see in the picture above, the operation MAS Update is in progress, so updates can’t be installed whilst that is running - makes sense. It will block operations such as adding a node to a scale unit and secret rotation.

I like this feature and will stop operators starting an update when it has no chance of completing due to these other activities taking place. Another thing I like is the ability to click on the link and it will take you to the activity log showing what operations are underway that is causing the block.

One thing that did catch my eye was the ability to stop, shut down, and restart an infrastructure role instance from the admin portal has been removed. I’ll admit that I have used this capability on more than one occasion, but I guess the telemetry that the PG have been receiving have shown that his has caused more problems than fixed, so whilst it is frustrating, I can understand the reasons.

Pre-2005 Update - You can restart an instance

Post-2005 update - You can only start a stopped instance

Most of the other updates relate to under the hood improvements such as autonomous healing capability, so reducing the number of alerts. Also, the Storage service API version 2019-02-02 is now supported.