Connecting Azure Stack Tenant Networks to …

If you have been working with Azure Stack and trying to connect networks together or connect to existing services within your own data center you may have come up against some hurdles. I was lucky enough to be able to help develop some patterns for Microsoft to expand the capability of Azure Stack. Using RRAS as the backbone of the solution enables multiple scenarios of connectivity. Below are some of the solutions that can be unlocked.

Scenarios.jpg

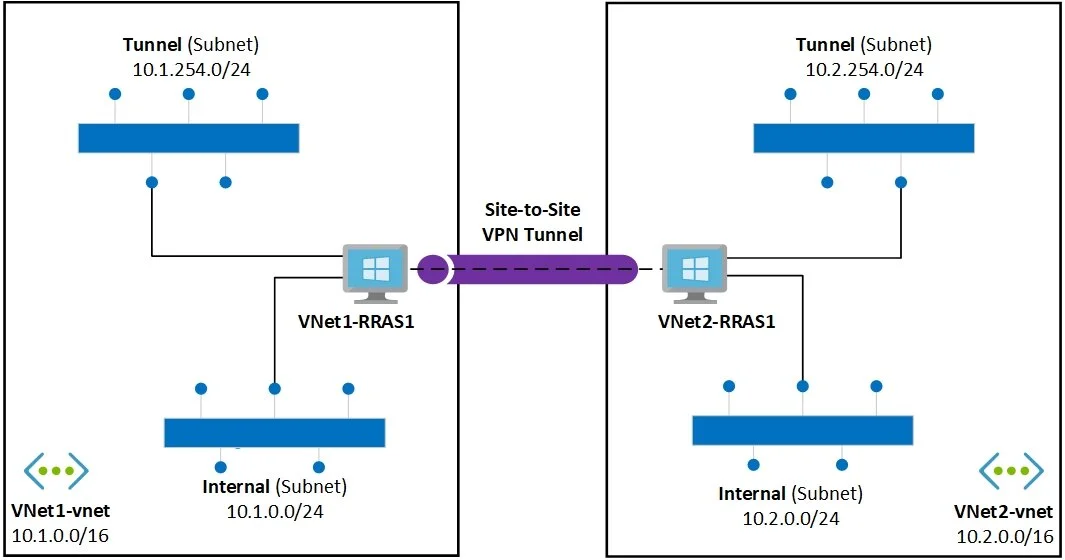
Here is a high-level overview of how the solution connects two different networks. An example is if you have a patching system that requires direct access to your systems to validate and orchestrate patching. By deploying one side of the tunnel to Azure Stack and one side into your on-prem systems, you would need to add a route within your networking infrastructure but once the solution is deployed and connected the systems would practically be considered adjacent and able to talk directly to each other.

Below are two single quick deployment templates. These are primarily designed for you to stand up the solutions and have a look at how it works. One solution uses IKE and the other uses GRE for the tunnels. While you can use these deployed templates and connect your systems to these VNets there is a modular version which is more flexible in term of deployment patterns and options.

https://github.com/Azure-Samples/azure-intelligent-edge-patterns/tree/master/rras-gre-vnet-vnet

https://github.com/Azure-Samples/azure-intelligent-edge-patterns/tree/master/rras-ike-vnet-vnet

This template is a modular version of the above solution. It requires you to deploy the RRAS server on each side of the tunnel and then configure the tunnel. There are slightly different parameters required for the IKE and GRE tunnels but you can configure both.

https://github.com/Azure-Samples/azure-intelligent-edge-patterns/tree/master/rras-vnet-vpntunnel

You can find all the appropriate details for deployment in the above links.

Hopefully, this helps unlock some value.

Issue adding additional workers using the administrator portal

I have recently deployed the App Service Update 7 resource provider to an Azure Stack 1908 region and came across a problem when trying to add instances to the web worker tiers via the admin portal, per the instructions here: https://docs.microsoft.com/en-us/azure-stack/operator/azure-stack-app-service-add-worker-roles?view=azs-1908#add-additional-workers-using-the-administrator-portal

The problem I came across was when I opened the Roles blade from within the App Service resource provider, trying to select the ScaleSet option for the worker tier was not possible.

I could select the Virtual Machine option if I selected the Controller role:

I checked the release notes for App Service Update 7 and couldn’t find anything that referenced the problem I have: https://docs.microsoft.com/en-us/azure-stack/operator/azure-stack-app-service-release-notes-update-seven?view=azs-1908

OK, so I can’t follow the documentation verbatim, but, the workaround is very straightforward. The worker tiers use VM scale sets, so from the admin portal, open up the Virtual machine scale sets admin blade:

Then select the worker tier you wan to modify:

Select the Scaling option and modify the instance count using the slider, or manually enter the number you want. Click Save to start the provisioning process.

Open the App Service / Worker Tiers blade; it will show the instance count has now increased:

It will take a while for the available instances to increment, so be patient.

You can, however, see that the instance count has increased if you select the Roles blade

Selecting a Worker instance will show you a little more detail. The example below, shows that 2 instances are installing:

Eventually, you should hopefully see something like the following:

Of course, you can use the PowerShell method, and that works out of the box, but I’ve modified the script in the document to be more Integrated system friendly :)

##### Scale out the AppService Role instances ######

 # Set context to AzureStack admin.
 Login-AzureRmAccount -EnvironmentName AzureStackAdmin

 $RegionName = 'local' # Change this to reflect the region.   ASDK is 'local'

 ## Name of the Resource group where AppService is deployed.
 $AppServiceResourceGroupName = "AppService.$RegionName"

 ## Name of the ScaleSet : e.g. FrontEndsScaleSet, ManagementServersScaleSet, PublishersScaleSet , LargeWorkerTierScaleSet,      MediumWorkerTierScaleSet, SmallWorkerTierScaleSet, SharedWorkerTierScaleSet
 $ScaleSetName = "SmallWorkerTierScaleSet"

 ## TotalCapacity is sum of the instances needed at the end of operation. 
 ## e.g. if your VMSS has 1 instance(s) currently and you need 1 more the TotalCapacity should be set to 2
 $TotalCapacity = 2  

 # Get current scale set
 $vmss = Get-AzureRmVmss -ResourceGroupName $AppServiceResourceGroupName -VMScaleSetName $ScaleSetName

 # Set and update the capacity
 $vmss.sku.capacity = $TotalCapacity
 Update-AzureRmVmss -ResourceGroupName $AppServiceResourceGroupName -Name $ScaleSetName -VirtualMachineScaleSet $vmss

Deploying the SQL RP with the latest Azure Stack PowerShell module

This is a quick post about how you can use the latest Azure Stack PowerShell module to deploy the SQL resource provider to Azure Stack (1908) , rather than having to use an older version that the RP documentation says you must do (which can be messy, having to remove / install various modules).

If you follow the pre-requisites, you require PowerShell for Azure Stack. Following the link in the pre-reqs gives you the instructions to install the latest version (1.7.2 at time of writing). I followed the instructions for version 1904 and later and that was great.

Further into the SQL RP document, there is a helper script to help you with the deployment. The script states that the modules required are for specific versions, which are outdated for 1908. This actually conflicts with the pre-requirement, as the link is to install version 1.7.2 of the AzureStack Module. I don’t particularly want o remove/install different version of Modules to my system as it is time consuming and unnecessary, IMO. Anyway, I decided to carry on as it may have been an oversight.

Next, I had download version 1.1.33.0 of the SQL RP

I ran the self-extracting exe file and from the extracted directory, I ran from and elevated PowerShell session the DeploySQLProvider.ps1 script

Even though I had followed all the pre-reqs in the article, an exception was thrown as seen below:

As you can see, it is complaining about the Azure Stack PowerShell module. I know that version 2.5.0 and ArmProfile 2019-03-01-hybrid is supported with Azure Stack 1908, so I took a look at the script to find out what was throwing this error.

I did a search for ‘Checking for Azure Stack Powershell Module …’ and it took me to the following :

It looked like the Test-AzureStackPowershell function was the candidate. The function wasn’t defined within the script, so it must have come from some other module. I ran the following commands to get the information I needed:

get-command Test-AzureStackPowerShell

get-module Common | ft Path

You can see the output here; the source of the function was the key to find where it resided:

Now I went and took a look at the Common.psm1 module.

I did a search for a distinct part of the error message that’s thrown - ‘Use ArmProfile 2018-03-01-hybrid’ and it took me to this:

I could see in the elseif statement that it was looking for a minor version equal to 3. Given that I’m running 2.5.0, that was never going to work. So to try and resolve the error, I changed the ‘-eq’ to ‘-ge’, so that it would work for any minor version greater or equal to 3 and above.

I removed the currently loaded Common module:

Remove-Module Common

Then I ran the DeploySQLProvider.ps1 script again:

Bingo! Fixed it. As you can see, it evaluates version 2.5.0 as supported and carries on until the deployment completes successfully…

sqlrp-10.png

So it turns out a simple change in the Common module has made life a lot more straightforward.


Using Lets Encrypt certificates with Azure Stack

Anyone who has deployed an Azure Stack integrated system will know that one of the crucial items to get right from the outset are the PKI certificates that will be used for external services, such as the portal, blob storage, ARM API’s. For production environments, Microsoft recommend having separate certificates for each of the endpoints, some of which require wildcard SSL certs. These tend to be more expensive if purchasing from a third party.

Of course, you could use an Enterprise CA based within your environment, but I’ve seen too many issues where intermediate CA’s are used to sign the SSL certificates, due to the public key not existing in the Microsoft or various Linux distro’s Trusted CA publishers store.

Side note: When A VM is provisioned on Azure Stack, only the root CA is imported by the WA agent. The intermediate CA public cert needs to be manually imported.

With all that in mind, I was lucky enough to work with a client who had the idea to cut costs, but to use a CA that is trusted universally; that being Lets Encrypt. As the strapline states on their website, ‘Lets Encrypt is a free, automated and open Certificate Authority’ .

Free? I like how much that costs, there must be a catch? Well, yes and no. The certs have a 90 day lifespan, so you’ll have to ensure you rotate the certificates before they expire, but this can be automated, so not a big deal. The documentation for expiration alerts say that you’ll be alerted when they’re within 30 days, but I’ve found you get warnings within 90 days, so be aware that you don’t just ignore them and they do eventually expire - make a note in your calendar!


So what do we need for this to implement this solution?

Here are the pre-reqs:

  • An Azure subscription

  • An Azure DNS Zone for your domain

  • A Service Principal within your Azure AD tenant

  • Azure PowerShell modules. If using the AZ modules, the Enable-AzureRmAlias should be set. N.B. This does not work with the Azure Stack PowerShell modules, as the AzureRM.Dns modules currently included do not support the creation of CAA records - we need this capability!

  • Azure Stack Readiness checker PowerShell Module.

  • Posh-ACME PowerShell module https://github.com/rmbolger/Posh-ACME

  • Oh, and my Azure Stack Lets Encrypt PoSh module :)

For anyone wondering how to setup Azure DNS zones for use with Azure Stack, please see my blog post here.

Assuming you’ve installed / imported / configured / downloaded all of the pre-reqs, extract the contents of the zip file downloaded for the Azure Stack Lets Encrypt Module and then:

1. Run the new-DNSTxtRole.ps1 script that is included within the Azure Stack Lets Encrypt zip file. It will prompt you for your credentials to connect to your Azure Subscription and then create a new called ‘DNS Zone Contributor’ within your subscription that you can use to assign least privileges to the Service Principal on your Resource Group that contains your DNS Zone. It restricts rights to creating TXT records so that Lets Encrypt can use them to verify that you are in fact the owner of the domain.

Here’s what the script contains:

# Use this to create a role to assign to service principal used by Posh-Acme

$profile = Connect-AzureRMAccount

$roleDef = Get-AzureRmRoleDefinition -Name "DNS Zone Contributor"
$roleDef.Id = $null
$roleDef.Name = "DNS TXT Contributor"
$roleDef.Description = "Manage DNS TXT records only."
$roleDef.Actions.RemoveRange(0,$roleDef.Actions.Count)
$roleDef.Actions.Add("Microsoft.Network/dnsZones/TXT/*")
$roleDef.Actions.Add("Microsoft.Network/dnsZones/read")
$roleDef.Actions.Add("Microsoft.Authorization/*/read")
$roleDef.Actions.Add("Microsoft.Insights/alertRules/*")
$roleDef.Actions.Add("Microsoft.ResourceHealth/availabilityStatuses/read")
$roleDef.Actions.Add("Microsoft.Resources/deployments/read")
$roleDef.Actions.Add("Microsoft.Resources/subscriptions/resourceGroups/read")
$roleDef.AssignableScopes.Clear()
$roleDef.AssignableScopes.Add("/subscriptions/$($profile.Context.Subscription.Id)")

$role = New-AzureRmRoleDefinition $roleDef
$role

2. Add your Service Principal to your DNS Zone as a ‘DNS Zone Contributor’. I named my Service Principal LetsEncryptAzureStack in this example.

From the portal, find your DNS Zone resource, and select Access Control (IAM). From the blade that opens, select +Add.

  1. Select the DNS Zone Contributor as for the Role

  2. In the Select field, type in the name of your Service Principal. Select it, then press Save

3 Now we need to create some CAA records within the domain. This is required by Lets Encrypt in order to create the certificates. I created a function within the module to handle this. From an elevated PowerShell session navigate to the folder you extracted the module to and run:

Import-Module .\AzSLetsEncrypt.psm1

Once imported, ensure you’ve connected to your Azure Subscription within PowerShell and run the following:

#Connect to Azure
Connect-AzureRmAccount
New-AzsDnsCaaRecords -ResourceGroup <ResourceGroup> -Region <Azure Stack Region Name> -FQDN <FQDN for the DNZ Zone> -PaaS

Enter the Resource Group that hosts your DNS Zone, The name of your Azure Stack region and the FQDN for the domain. Optionally, if you specify the PaaS switch, it will create the CAA records for the PaaS endpoints too. If everything is in place, you should hopefully see something that looks like this in your Azure DNS Zone: This step only has to be run once, unless you delete the CAA records.

4 Now we’ve got all of that in place, we can create our certificates! Assuming you’ve still got the module imported, you can use the New-AzsPkiLECertificates function to create your certs. Rather than explain all the options, I’ve created a wrapper script :

$DebugPreference = 'continue'

$Region = '<Azure Stack Region Name>'
$FQDN = '<FQDN>'
$DNSResourceGroup = '<DNS Zone Resource Group>'

$Params = @{
 RegionName = $Region
 FQDN = $FQDN
 ServicePrincipal = '<Service Principal GUID>'
 ServicePrincipalSecret = '<Service Principal Secret>'
 pfxPass = 'P@ssword!'
 SubscriptionId = '<Subscription ID>'
 TenantId = '<Tenant ID>'
 CertPath = 'c:\azsCerts'
}

$scriptpath = $PSScriptRoot
cd $scriptpath
import-module .\AzSLetsEncrypt.psm1


#New-AzsDnsCaaRecords -ResourceGroup $DNSResourceGroup -Region $Region -FQDN $FQDN -PaaS
New-AzsPkiLECertificates @Params -Force -paas

The function will create the core certificates and if you select the PaaS switch, the optional App service and SQL RP certs. It will take a while to run as, as there is an element of waiting for the TXT records that are created for validation to replicate.


Once all the certificates have been created, they are validated to ensure they are compatible for use with Azure Stack using the Microsoft.AzureStack.ReadinessChecker module.:

Once the script has completed, you should have a folder structure that looks like this:

I’ve used these certificates in two installations now and they’ve worked with no problems.

As the Posh-Acme module is used to generate the certs, the data is stored here:

%userprofile%\AppData\Local\Posh-ACME

 If you need to recreate the certs before the allowed renewal period within the Posh-ACME module, or have some issues, you can delete the sub folders in this location and re-run the script.

The folder structure that’s generated should match the requirements for the Azure Stack install routine / certificate rotation. Check out the documentation here on how to rotate the certificates if they’re coming towards their expiration date.

I hope this is of some use and allows you to save some money!

Using an Azure DNS Zone for name resolution in your Azure Stack region.

I was asked by a client recently on whether it was possible to use Azure DNS zones with Azure Stack for name resolution, as they could not find any information on how to do it. The answer to that is yes, and is actually my preferred method, whether the Azure Stack region is publicly available, or internally within an enterprise.

Here’s how to do it:

From your Azure Subscription, create an new DNS Zone:

Enter details such as Resource Group, location and most importantly, the name of the Zone. For this, I’m using a domain I own called dmc-tech.uk.

DO NOT create a zone for your Azure Stack deployments that includes the region name, e.g. azst.dmc-tech.uk, as it will complicate matters, such as adding additional regions for your domain, or adding DNS names to your Public IP addresses. I’ll get to how you can have multiple regions within your zone later.

Once the zone has been created, make a note of the Name Servers hosting the records for your zone as you will need the to modify the Name Servers with your Domain registrant.

Typically, they will have a name of:

  • ns1-<xx>.azure-dns.com

  • ns1-<xx>.azure-dns.net

  • ns1-<xx>.azure-dns.org

  • ns1-<xx>.azure-dns.info

I used UK2.net to register my domain, so this is the screen I used to modify the NS records. Other registrants have similar capabilities:

To test that the records have updated, I run NSLookup to perform a check to make sure they have replicated:

As you can see above, the name servers match those I have set for the DNS Zone in Azure.

The next task is to create some A records in the Azure DNS Zone to match the names of the external DNS name servers of your Azure Stack region. You should get the details for this from your OEM when they have performed the deployment, or you can work it out for yourself as the addresses are taken from the Public VIP network range.

For example, if the Public VIP range is 10.10.1.0/24, the addresses would be 10.10.1.15 and 10.10.1.16. This applies for the current Azure Stack release (1908 at time of writing)

Create the records as follows in the Azure portal:

Within your zone, select +Record Set

  1. enter the hostname. you also include the region name of your Azure Stack instance here, so the form is <hostname>.<regionname>

  2. Ensure the record type is set to A

  3. Enter the IP address of the first external DNS server for your Azure Stack instance

  4. Enter the IP address of the second external DNS server for your Azure Stack instance (You don’t have to do this, but I do it for a belt and braces approach)

Click on Apply to save the record. Repeat the above steps to create another A record for the second external DNS Name server, changing the hostname accordingly.

Once you’ve created your A records, you can now create the NS records for your region. The steps to do this are similar to creating an A record:

Within your zone, select +Record Set

  1. enter the name of you region. In this example it’s azs

  2. Ensure the record type is set to NS

  3. Enter the FQDN of the first external DNS server for your Azure Stack instance. It should match the name of the A record you created previously.

  4. Enter the FQDN of the second external DNS server for your Azure Stack instance

Click on Apply to save the record.

We also need to add a Name Server record for <region>.cloudapp, otherwise, when you assign a DNS name to a public IP address, your client won’t be able to resolve the name. The process is the same as above:

Within your zone, select +Record Set

  1. enter the name of you region.cloudapp. In this example it’s azs.cloudapp

  2. Ensure the record type is set to NS

  3. Enter the FQDN of the first external DNS server for your Azure Stack instance. It should match the name of the A record you created previously.

  4. Enter the FQDN of the second external DNS server for your Azure Stack instance

Click on Apply to save the record.

Once you’ve created your records, you should have something that look similar to this:

To test that your DNS changes have replicated, use NSLookup again. As you can see, the name servers for azs.dmc-tech.uk and azs.cloudapp.dmc-tech.uk resolve to the name servers I’ve set in the Azure DNS zone.

To be clear, your external name servers do not have to be exposed to the internet and as you can see in this example, I’m using addresses within the IANA private network ranges. As long as your corporate DNS servers have forwarders to public DNS zones, it should work. When your internal clients try to access your Azure Stack public endpoints, as long as they can route to your Azure Stack external DNS servers and UDP 53 is allowed via your firewalls, all should be good.

If you want to add additional regions using the same domain, simply follow the process above again :)

I hope that clarifies how you can use this kind of setup within your environment